The battle of Chunuk Bair, Gallipoli, was part of a combined assault to take the Sari Bair Range. This took place from the 6th to 10th of August 1915, and was a combination of Australian, New Zealand, British, Indian and Gurkha soldiers. The attack on Chunuk Bair used the New Zealand Expeditionary Force. This comprised four Regiments; they were the Auckland, Wellington, Canterbury and Otago Regiments.[1] The New Zealand objective was to take Chunuk Bair and hold the peak and if this was successful then the August offensive might be achieved. General Ian Hamilton had decided that the only chance they now had was to attack the Turks above ANZAC Cove.[2]
The attack was planned for the 6th of August 1915 and would include Lieutenant General Frederick Stopford. Stopford was to be at the northern beach of Suvla and establish a third beachhead; this would expand the Allied front. The objective was to capture the highest points above ANZAC Cove and these points formed part of the Sari Bair Range.[3] While the New Zealanders were attacking the slopes leading to Chunuk Bair, other Regimental attacks were to be mounted at Cape Helles, the Nek and the Turkish trench at Lone Pine. These attacks were designed to confuse the Turks and enable the New Zealand Regiments to claim the higher ground. [4]
The British planned an amphibious landing at Suvla Bay. Stopford was to command this landing and the inland attack at the northern end of Sari Bair Range. This attack was then to link up with the ANZACs attacking from the south. A total of around 100,000 soldiers were to attack the Turkish positions at a designated time.[5] The attack was broken into two fighting columns and was orchestrated by Major General Alexander Godley.[6] The aim of the right column which comprised the New Zealand Regiments was to capture Chunuk Bair. This was to be done with part of the column moving through the Chailak Dere gully to the Rhododendron Ridge. From here both columns were to meet, advance to Sazli Dere and finally assault Chunuk Bair.[7] The New Zealand Mounted Rifles attacked the Turkish positions in the foothills of the range. The objective of the Mounted Rifles was to clear the way for the New Zealand Infantry Brigade who were to take Chunuk Bair by first light on the 7th of August. The New Zealanders succeeded in the struggle at the foothills and this was a brilliant beginning for the final assault.[8]

By dawn, Malone and his men had captured Chunuk Bair, but what they now realised was that Chunuk Bair was not a sharp peak, but two humps with a saddle between them. The ground was rough and rocky which limited the Wellingtons in digging adequate trenches and the hill was also open to fire from the north and south. The Turkish troop positioned to the north on Hill Q could fire directly onto Chunuk Bair and along with the Turkish troops to the south on Battleship Hill; they were able to attack the back of the Wellingtons across Sazli Dere.[12]
From the 8th to the 9th of August, the New Zealand troops fought of numerous Turkish attacks. The Wellingtons held both trench lines on the summit with the Gloucester and the Welsh pioneers digging in behind either side on the New Zealanders.[13] The troops holding the summit were constantly attacked by Turkish troops led by Mustafa Kemal. The Wellingtons counterattacked and momentarily dislodged the Turks from their position.[14] The Gloucester’s were overrun on Malone’s left and broke away leaving the left flank exposed.[15] Around 5pm Malone was killed by shrapnel, friendly artillery fire from a warship or an unfortunate artillery barrage from a nearby ANZAC Battery. The New Zealanders were able to hold onto Chunuk Bair that night repelling Turkish attacks and were later relieved by the Wellington Mounted Rifles and the Otago Battalion.
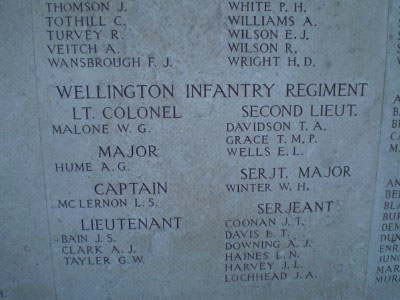
The names of some of the Wellington Infantry Regiment on the plaque at Chunuk Bair. Listed is one Lt Colonel Malone W.G.[16]
The casualty rate among the Wellingtons, Gloucester’s and Welsh Pioneers was catastrophic. The Wellingtons who arrived with 750 men only had 2 officers and 47 men left unwounded. The Gloucester’s lost 350 men and every officer was either killed or wounded and the Welsh lost 417 men and 17 officers as well.[17] The final relief column of two battalions arrived at Chunuk Bair; they were Kitchener’s New Army and comprised the 6th Loyal North Lancashire’s and the 5th Wiltshire’s. These two battalions had never faced a battle were now tasked at holding onto Chunuk Bair.[18] On the opposing side of the hill, six Turkish battalions formed up ready for a final assault on Chunuk Bair. On the 10th of August at 4:45am Mustafa Kemal walked forward, raised his hand to his troops to begin the attack. The Lancashire’s were bayoneted to a man and the Wiltshire’s who were resting in a valley below with guns unmanned were only able to turn and run.[19]
The Turks rushed forward with the intention of forcing the British off the hill, but were met with a machinegun assault by the New Zealand gunners on a nearby hill. This machine gun assault by the New Zealanders halted the advancing left wing of the Turks. The British troops were decimated with half either killed or wounded. The Turks were too exhausted to continue and retreated to the crest and remained in possession of Chunuk Bair. The Turkish troops crushed the advances of the Imperial forces and ended the British objective of taking the Sari Bair Range.[20]
The August campaign to take the Sari Bair Range was beginning to fall apart. The losses incurred at the Nek and Chunuk Bair was clear that the British had underestimated the tenacity of the Turkish soldiers, failed to take the initiative when they had the chance and willingly slaughtered good fit fighting men. The loss of over 800 New Zealand soldiers on the attack at Chunuk Bair is a clear indication that they gave their all to defend the undefendable.
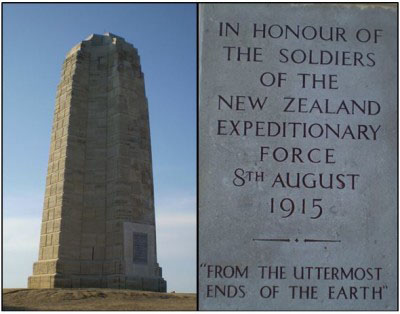
The monument dedicated to the New Zealand soldiers atop Chunuk Bair.[21]
References
Books
Carlyon, Les. Gallipoli, Macmillan Pty Limited, Sydney, 2002.
Gilbert, Martin. First World War, Orion Publishing Group Ltd, London, 1994.
King, Jonathon and Bowers, Michael. Gallipoli: untold stories from war correspondent Charles Bean and front line ANZACS, Random House, Australia, 2005.
MacDonald, Lyn. 1914-1918 Voices & Images of the Great War, Penguin Group, London, 1988.
Travers, Tim. Gallipoli 1915, Tempus Publishing Ltd, Gloucestershire, 2002.
Websites
Gallipoli and the ANZACS, A ‘duty clear before us’-North Beach and the Sari Bair Range (2010), http://www.anzacsite.gov.au/1landing/nbeach4_2.html [accessed 14 August 2014].
New Zealand History Ministry for Culture and Heritage, Wellington Battalion captures Chunuk Bair, (27 August 2014), http://www.nzhistory.net.nz/wellington-battalion-captures-chunuk-bair [accessed 13 June 2014].
New Zealand History Ministry for Culture and Heritage, William Malone at Gallipoli (updated 04 September 2014), http://www.nzhistory.net.nz/media/photo/wgmalone, [accessed 04 September 2014].
Images
Authors personal photographs taken in 2010, pages 4 and 5.
[1] New Zealand History Ministry for Culture and Heritage, Wellington Battalion captures Chunuk Bair, (27 August 2014), http://www.nzhistory.net.nz/wellington-battalion-captures-chunuk-bair [accessed 13 June 2014].
[2] Jonathon King and Michael Bowers, Gallipoli: untold stories from war correspondent Charles Bean and front line ANZACS (Australia: Random House, 2005), p. 155.
[3] ibid.
[4] ibid.
[5] ibid., p. 157.
[6] Tim Travers, Gallipoli 1915 (Gloucestershire: Tempus Publishing Ltd, 2002), p. 114.
[7] ibid.
[8] Gallipoli and the ANZACS, A ‘duty clear before us’-North Beach and the Sari Bair Range (2010), http://www.anzacsite.gov.au/1landing/nbeach4.html, [accessed 14 August 2014].
[9] New Zealand History Ministry for Culture and Heritage, William Malone at Gallipoli (updated 04 September 2014), http://www.nzhistory.net.nz/media/photo/wgmalone, [accessed 04 September 2014].
[10] Les Carlyon, Gallipoli (Sydney: Macmillan Pty Limited, 2002), pp. 426-427.
[11] Martin Gilbert, First World War, (London: Orion Publishing Group Ltd, 1994), p. 182.
[12] Carlyon, Gallipoli, p. 427.
[13] Gallipoli and the ANZACS, A ‘duty clear before us’-North Beach and the Sari Bair Range (2010), http://www.anzacsite.gov.au/1landing/nbeach4_2.html [accessed 14 August 2014].
[14] Gilbert, First World War, p. 182.
[15] Carlyon, Gallipoli, p. 436.
[16] Author (Mark Jamieson) personal photographs taken in 2010.
[17] Carlyon, Gallipoli, p. 443.
[18] Gilbert, First World War, p. 182.
[19] ibid.
[20] Lyn MacDonald, 1914-1918 Voices & Images of the Great War, (London: Penguin Group, 1988), p. 99.
[21] Author (Mark Jamieson) personal photographs taken in 2010.
Contact Mark Jamieson about this article.