The German Spring Offensive, which began with Operation Michael in March 1918, had culminated by the Second Battle of the Marne in mid-July 1918. By this time, the German superiority of numbers on the Western Front had sunk to a negligible lead which would be reversed as more American troops arrived. German manpower was exhausted. The German High Command predicted they would need 200,000 men per month to make good the losses being suffered. Returning convalescents could supply 70,000–80,000 per month, but there were only 300,000 recruits available from the next annual class of 18-year-olds.
The German failure to break through at the Second Battle of the Marne, or to destroy the Allied armies in the field, allowed Ferdinand Foch, the Allied Supreme Commander, to proceed with the planned major counter-offensive. By this time, the American Expeditionary Force (AEF) was present in France in large numbers and invigorated the Allied armies. Likewise, the British Expeditionary Force (BEF) also had been reinforced by large numbers of troops from the Sinai and Palestine Campaign and the Italian Front, and from replacements previously held back in Britain by the Prime Minister, David Lloyd George.
The Allied Counter-Offensive Plan
Foch began this counter-offensive campaign with an attack in the Champagne-Marne sector (south of the Somme sector) between 18 July and 6 August 1918. Three French armies, with five American divisions attached and supported by 225 Renault light tanks, advanced 50km and cleared the ‘Marne Salient’ which threatened Paris.
The next stage of the counter-offensive was an attack in the Somme sector to reduce the Amiens salient and to free the railway lines that ran through Amiens from German shellfire. Foch agreed on a proposal by Field Marshal Sir Douglas Haig, Commander-in-Chief of the BEF, to strike on the River Somme east of Amiens with the objective of forcing the Germans away from the vital Amiens–Paris railway. The Somme sector was chosen as a suitable site for the offensive for several reasons. The Picardy countryside provided a good surface for tanks, which was not the case in Flanders. Also, the German defences, manned by the 2nd (German) Army, were relatively weak, having been subjected to continual raiding by the Australians in a process termed ‘peaceful penetration’. At a meeting on 24 July 1918, Foch agreed to the plan but directed that the 1st (French) Army, which held the front to the south of the 4th (British) Army, was to be involved. Foch appointed Haig to oversee the efforts of the two Armies.
The attack in the Somme sector was carried out by the BEF’s 4th (British) Army, under the command of General Sir Henry Rawlinson, in the northern half of the sector and the 1st (French) Army, under the command of General Debeney, in the southern half of the sector.
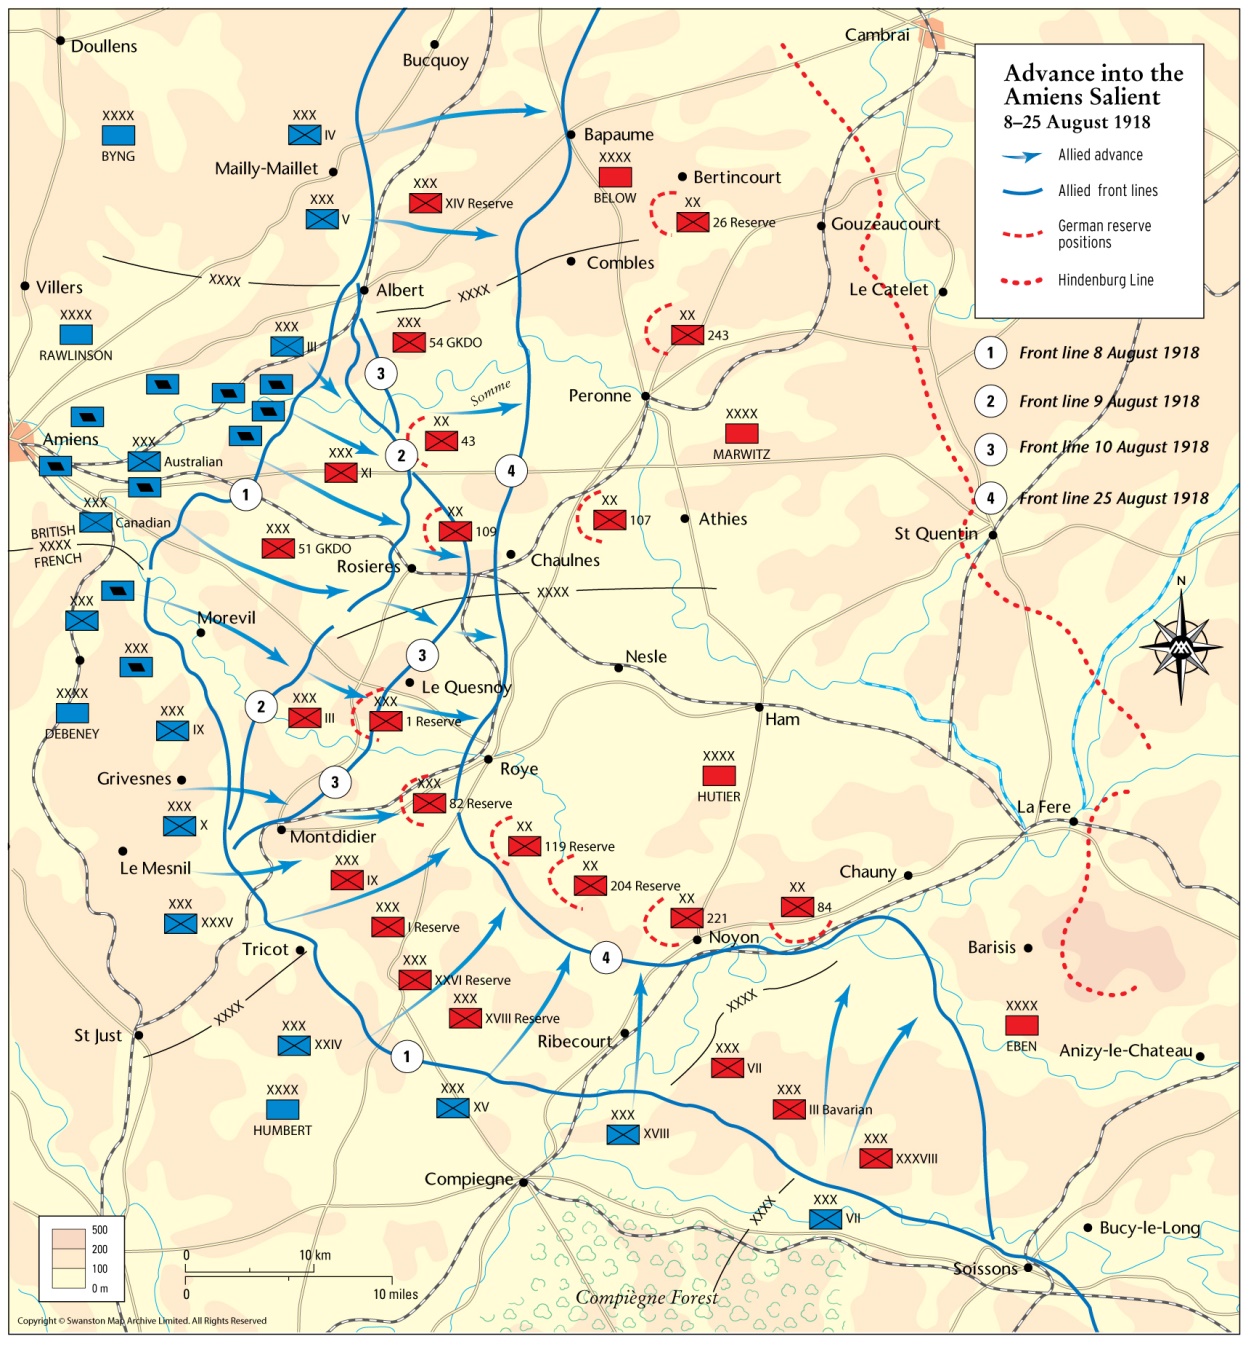
The 4th (British) Army was comprised of three sizeable (infantry) corps (each of four to six divisions) and a cavalry corps (of three divisions). The British III Corps (with four divisions plus the 131st Infantry Regiment of the 33rd (US) Division) was to attack north of the Somme; the Australian Corps (with five Australian divisions and one British division) was to attack south of the river in the centre of 4th (British) Army’s front; and the Canadian Corps (with four Canadian divisions and one British division) was to attack on the southern flank of the Australians. The Canadian and Australian Corps together comprised over 200,000 men and were the 4th (British) Army’s main effort. The Cavalry Corps was to be prepared to exploit a breakthrough in the German line. Rawlinson also maintained the 63rd Royal Naval Division and a tank battalion as a reserve.
To achieve surprise, there was no pre-attack bombardment. The artillery fire support plan for the 4th (British) Army involved 1,386 field guns and howitzers and 684 heavy guns, comprising 27 medium artillery brigades and thirteen heavy batteries, in addition to the infantry divisions’ organic artillery. The fire plan allowed 504 out of 530 German guns to be hit at ‘zero hour’, while a creeping barrage preceded the advancing infantry.
The 4th (British) Army’s attack was also supported by 580 tanks which helped to cut through the numerous barbed wire defences employed by the Germans. The Canadian and Australian Corps were each allocated a brigade with 108 Mark V fighting tanks and 36 Mark V ‘Star’ tanks. The Australian Corps was additionally allocated an armoured car battalion. A single battalion of 36 Mark V tanks was allocated to III Corps. The Cavalry Corps was allocated two battalions each of 48 Medium Mark A Whippet tanks.
Support to the 4th (British) Army by the Royal Air Force consisted of an unprecedented 782 aircraft. They were used for reconnaissance, masking the sound of advancing tanks, countering German aircraft, directing Allied artillery, resupplying advancing infantry units as well as bombing German positions in depth. The 4th (British) Army’s attack became known as the Battle of Amiens.
The 1st (French) Army was comprised of four infantry corps (each of two to five divisions) and a cavalry corps (of three divisions). The attack was supported by 72 Medium Mark A Whippet tanks as well as significant artillery and air resources. The 1st (French) Army’s attack became known as the Battle of Montdidier.
8 August 1918
In all, 31 Allied divisions, supported by thousands of guns, thousands of aircraft and over 600 tanks, were launched against the German positions in foggy conditions at 4.20 a.m. on 8 August 1918. Because they had fewer tanks, the French had to precede their advance with a 45-minute artillery bombardment to reduce the German barbed wire defences.
Due to good Allied planning and excellent deception measures, the Germans were unaware of the pending attack. The attack achieved such surprise that German forces only began to return artillery fire after five minutes – at the positions where the Allied forces had assembled at the start of the battle but by then had vacated.
In the 4th (British) Army’s zone seven divisions led the first phase of the attack: the British 18th (Eastern) and 58th (2/1st London), the Australian 2nd and 3rd, and the Canadian 1st, 2nd and 3rd Divisions. For the first time, the Australians would attack side by side with the Canadian Corps. Both had a reputation for aggressive and innovative tactics and a strong record of success over the past two years.
The attack broke through the German lines and tanks attacked German rear positions, sowing panic and confusion. The Australian units advanced about 2km and secured their first objective line by 7:30 a.m. The speed of their advance was such that a party of German officers and some divisional staff were captured while eating breakfast.
By 8:30 a.m., the Australian 4th and 5th Divisions and the Canadian 4th Division were passing through the initial breach in the German lines and leapfrogged through the lead units. The Canadian and Australian forces in the centre advanced quickly to their second objective line, pushing the front line over 4km forward from its starting point by 11:00 a.m. The third phase of the attack was assigned to infantry-carrying Mark V ‘Star’ tanks. The infantry, however, was able to carry out this final step unaided. The Allies penetrated well to the rear of the German defensive front. The cavalry – one brigade in the Australian sector and two cavalry divisions in the Canadian sector – then continued the advance and harried the retreating troops beyond the third objective line.
By the end of the day, a gap 24km wide had been torn in the German line. The Canadians penetrated 13km, the Australians 11km, the French 8km, and the British 3km. There was less success north of the Somme River, where the British III Corps had only a single tank battalion in support, the terrain was rougher and a German incursion of 6 August had disrupted some of the preparations. Although the British gained their first objectives, they were held up short of the Chipilly Spur, a steep wooded ridge.
The 4th (British) Army took 12,000 prisoners while the 1st (French) Army captured a further 3,000. Total German losses on 8 August were estimated to be 30,000. The 4th (British) Army suffered about 9,000 killed, wounded and missing.
Subsequent Attacks in August 1918
The Germans on Chipilly Spur commanded a wide field of fire to the south of the Somme River, and their flanking fire held up the left units of the Australian Corps until late on 9 August, when a small Australian party slipped across the river and captured the village of Chipilly itself, together with a renewed attack by III Corps. Further south, the 3rd (French) Army – with an additional seven divisions – joined the counter-offensive and occupied the abandoned town of Montdidier on 10 August.
On 11 August an extraordinary chance gathering at Villers-Bretonneux of senior allied generals and politicians made Monash and Currie the centre of congratulations. The next day the king invested Monash as Knight Commander of The Most Honourable Order of the Bath (KCB) – an honour that had been bestowed in the January 1918 New Year’s Day Honours List.
The advance continued for five days until 12 August, but without the spectacular results of the first day. The Allies managed to penetrate up to 22km from their start lines, but the rapid advance outran the supporting artillery, stretched supply lines, congested roads, and the number of taskworthy tanks was quickly reducing. These challenges, coupled with up to nine divisions of Germans being fed into the line as reinforcements, meant that the Allies lost tactical initiative and momentum on this axis of advance.
On 15 August 1918, Foch demanded that Haig continue the Somme sector offensive. Instead of reinforcing the salient formed by the 4th (British) Army, Haig launched a new offensive by the 3rd (British) Army, under the command of General Sir Julian Byng, at Albert just to the north, which began on 21 August. This offensive was known as the Second Battle of Albert and was also a success, capturing Albert on 22 August. Then on 26 August, further to the north of the initial Somme sector attacks, the 1st (British) Army, under the command of General Sir Henry Horne, widened the gap by another 11km in the Second Battle of Arras.
The counter-offensive was further widened in the southern half of the Somme sector by the 10th (French) Army in the Second Battle of Noyon, capturing the town of Noyon and the Aisne Heights as well as 8000 German prisoners on 29 August. By 4 September, the Australian Corps had captured Mont St. Quentin-Péronne and Bapaume.
Assessment
Over three weeks the German Army had been severely mauled, had used up most of its reserves and had been pushed back across a 55km-wide front. Almost all of its territorial gains from the March Spring Offensive had been lost and it was back on the Hindenburg Line where it had started with such high hopes six months earlier. Its manpower was reducing rapidly while the seemingly unlimited manpower of the AEF was increasingly being applied against it. German morale plummeted.
British war correspondent Philip Gibbs wrote on 27 August that: “the enemy … is on the defensive” and, “the initiative of attack is so completely in our hands that we are able to strike him at many different places”. He went on to say that the shift in troop morale “has been greater in the minds of men than in the taking of territory. On our side the army seems to be buoyed up with the enormous hope of getting on with this business quickly” and that, “there is a change also in the enemy’s mind. They no longer have even a dim hope of victory on this western front. All they hope for now is to defend themselves long enough to gain peace by negotiation.”
The German General Erich Ludendorff described the 8 August 1918 as the “Schwarzer Tag des deutschen Heeres” (“the black day of the German Army”), not because of the ground lost to the advancing Allies, but because the morale of the German troops had sunk to the point where large numbers of troops began to surrender. He recounted instances of retreating troops shouting “You’re prolonging the war!” at officers who tried to rally them, and “Blackleg!” at reserves moving up. An end to the war seemed near.
Contact Marcus Fielding about this article.